XYplorer设置-Everything与管理软件XYplorer的集成
2024年老白博客Windows平台文件管理软件xyplorer设置教程系列之:2024超级文件搜索Everything与管理XYplorer的集成,包括XYplorer 间接调用 Everything搜索和Everything 内容打开到 XYplorer 侧两种。

(老白博客www.xcbtmw.com转载自:https://github.com/violet7pan/XYplorer_Help,感谢作者分享,备份以快捷访问)
Everything 内容打开到 XYplorer
Options->General->Context Menu,如图
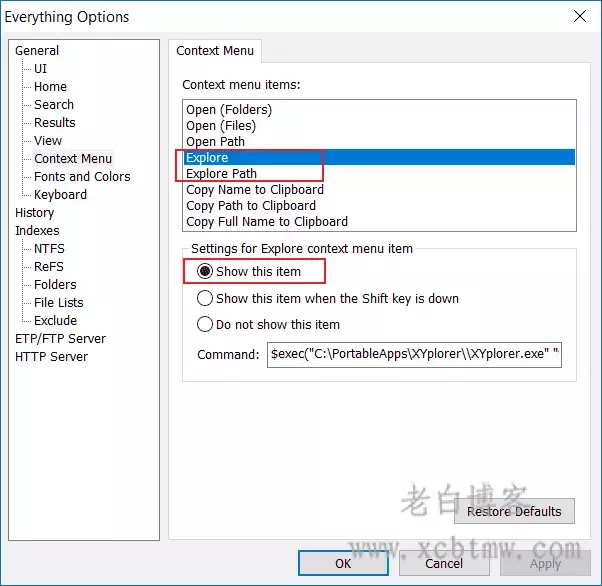
Explore:
$exec("你的XYplorer安装目录XYplorer.exe" "%1")
Explore Path:
$exec("你的XYplorer安装目录XYplorer.exe" /select="%1")
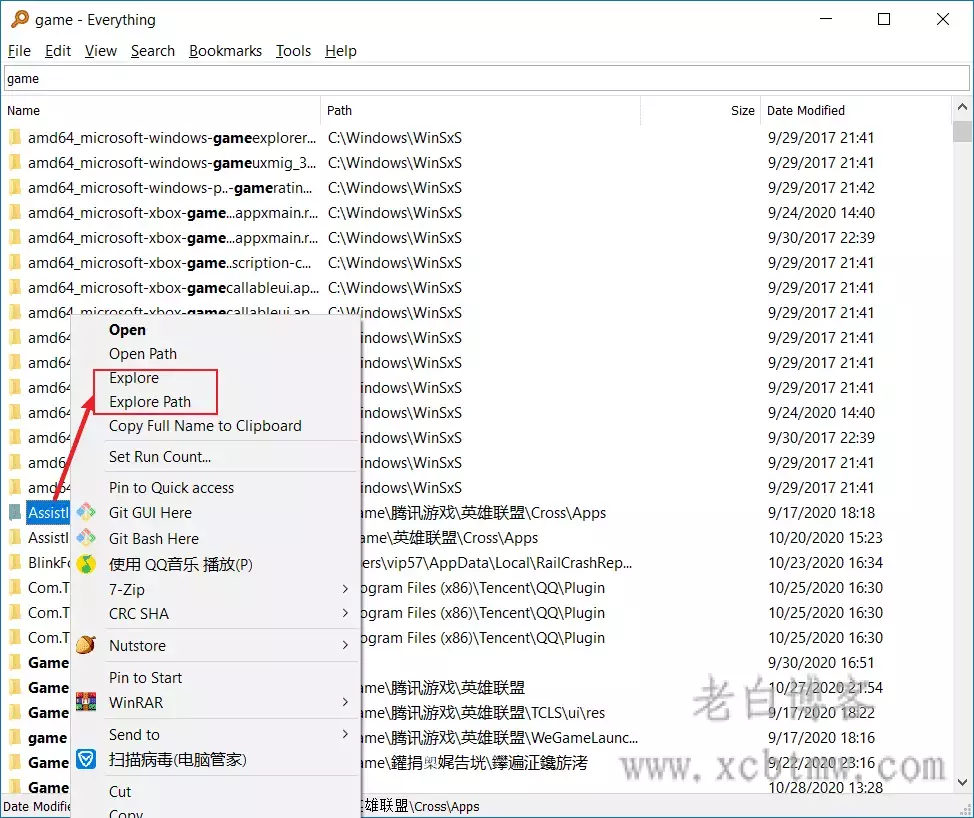
效果展示
Explore 和 Explorer Path 的区别:前者打开这个文件;后者打开这个文件所在的父目录。
参考:Everything and XYplorer - My Everything Integration Settings - XYplorer Beta Club
这里有个以前用过目前弃用的 Scripts 的链接:Everything for xyplorer - XYplorer Beta Club。如果你感兴趣,可以尝试一下。
当然,纠结 Scripts 文件来调用 Everything's command-line ES 服务来搜索是没有必要的,复杂麻烦而且没直接使用 Everything 来得快。你可以跟我一样,添加一个 Everything 按钮,或者设置一个热键调用 XY(请参考 XYplorer 间接调用 Everything)。
XYplorer调用 Everything
仅在当前目录下搜索(搜索的目标包括当前目录和当前目录的所有子目录),
显示效果
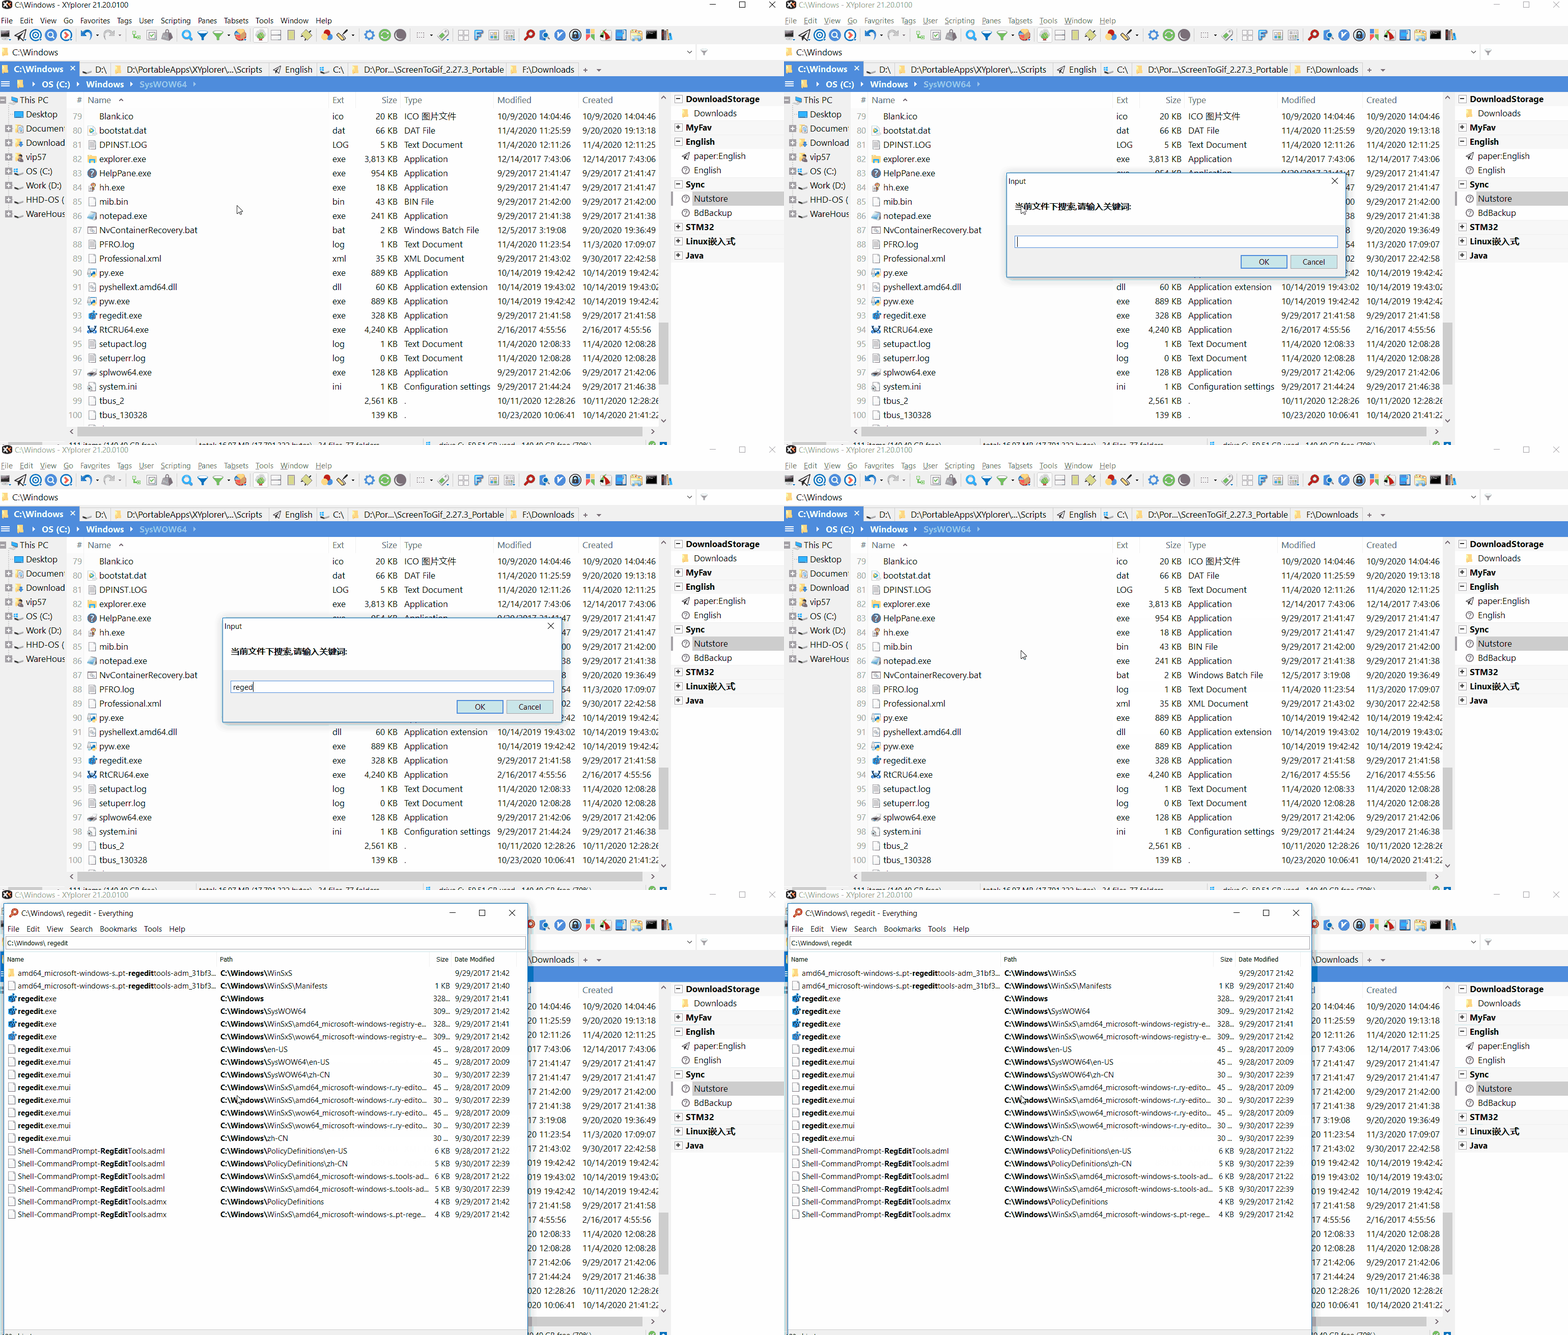
具体显示步骤
1. 创建脚本文件。菜单栏 Scripting->Go to Scripts Folder 来到 <xyscripts> 的目录下,创建名为 EverythingCurpathSearch.xys 脚本文件,内容如下,记得修改 everything 目录
版本一 [可选,推荐]
$everything = "D:PortableAppsEverythingeverything.exe";		//填写everything.exe路径
runret ("cmd /c ".$everything." -path "."""<curpath>""");
以上每行语句都有一个 Tab 哦。
版本二 [可选]
版本二特别注意:搜索的关键词首尾不能分别带有 "。也就是没办法进行准确搜索。比如 "Common Files"
$everything = "D:PortableAppsEverythingeverything.exe";		//填写everything.exe路径
$args = input("当前文件下搜索,请输入关键词:");
runret ("cmd /c ".$everything." -path "."""<curpath>"""." -s "."""$args""");
2. 绑定热键。菜单栏 User->Manage Commands...(Ctril + Alt + F9)
3. 绑定热键。菜单栏 User->Manage Commands...(Ctril + Alt + F9)
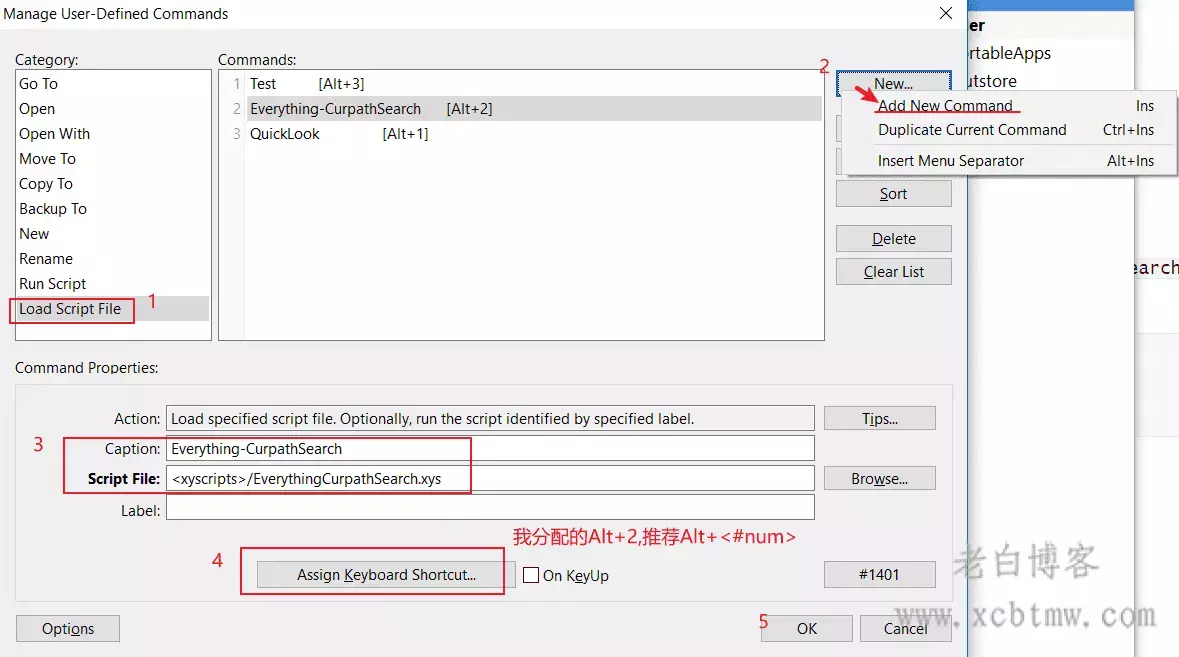
Cpation:CurpathSearch
Script Files:<xyscripts>/EverythingCurpathSearch.xys
这样就设置完成了。开始使用吧,在 XYplorer 当前 Tab 所在当前目录下按 Alt+2,键入你想要搜索的 key words,然后 Enter 即可。
Script 编写思路:通过命令行调用 everything,everything 想要完成当前目录搜索,需要知道主程序的外部接口 [?],需要获取当前目录和用户键入值。
Script 中 runret () 可参考 XYplorer.chm
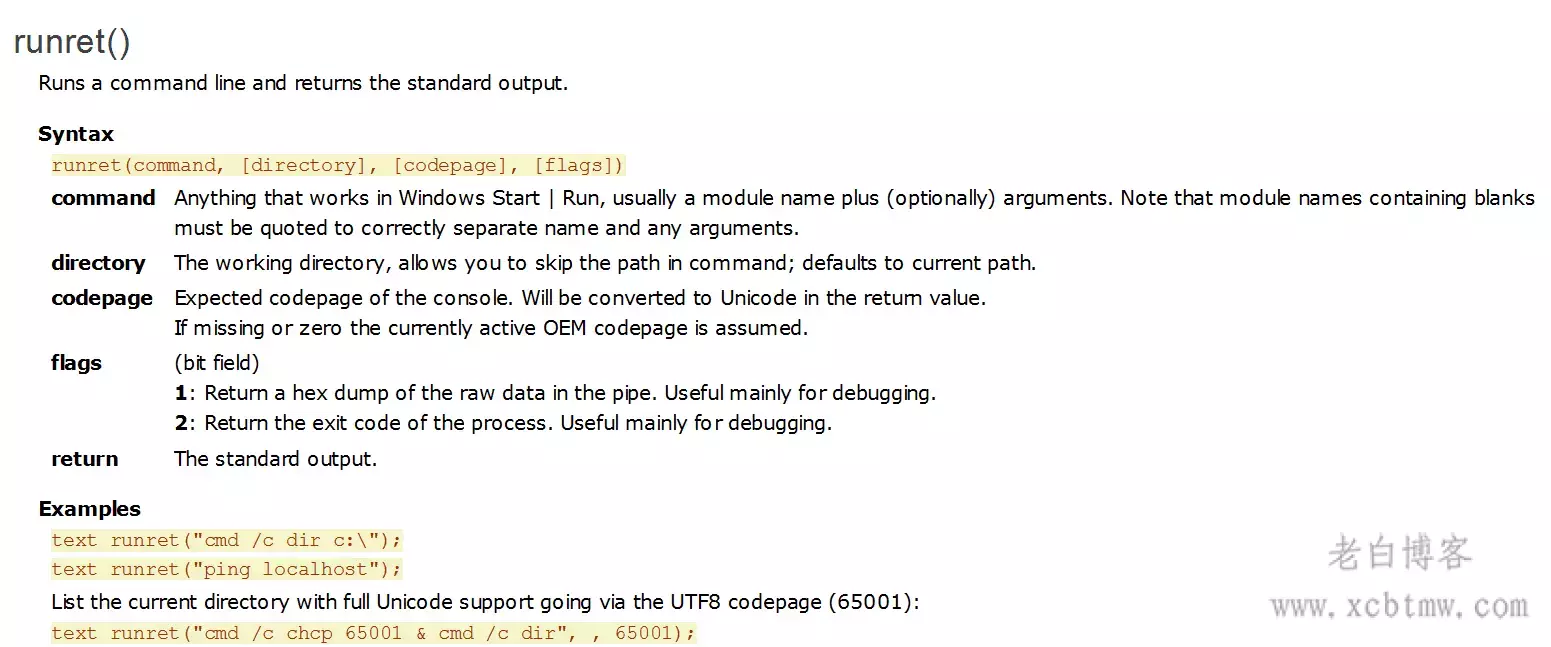
编写的脚本很简陋,其目的主要是为了打开 Everything,并自动化地添加上当前目录。
如果有兴趣的同学们可以自行研究下 XYplorer Script (可参考 XYplorer - 脚本篇 (Scripting) 和 XYplorer Scripting 笔记 ,熟悉流程控制语句和常用的 Script Command 就可以进行更高逻辑的功能实现了。
更多xyplorer设置教程请点击文末标签阅读!

Scripting->Go to Scripts Folder 来到 <xyscripts> 的目录下,创建名为 EverythingCurpathSearch.xys 脚本文件,内容如下,记得修改 everything 目录$everything = "D:PortableAppsEverythingeverything.exe"; //填写everything.exe路径
runret ("cmd /c ".$everything." -path "."""<curpath>""");
"Common Files"$everything = "D:PortableAppsEverythingeverything.exe"; //填写everything.exe路径
$args = input("当前文件下搜索,请输入关键词:");
runret ("cmd /c ".$everything." -path "."""<curpath>"""." -s "."""$args""");
User->Manage Commands...(Ctril + Alt + F9)3. 绑定热键。菜单栏
User->Manage Commands...(Ctril + Alt + F9)
Cpation:CurpathSearch
Script Files:<xyscripts>/EverythingCurpathSearch.xys
XYplorer.chm


![[Windows] 电脑【桌面宠物】华硕天选姬](https://www.xcbtmw.com/wp-content/uploads/2023/07/20230726165146-388d6.jpeg.webp)
